I know painters who have painted many years and have never stretched a canvas. That’s fine… but, there are several reasons why I do it and thought you might like to see how easy it is. If you can wrap a package you can do this!
Here’s the canvas rolled out on the studio floor. (I bought 3 yards of unprimed 60″ wide canvas at the art store.)
Next, I place the stretcher bars face down on top. The photo makes it look like a square, but the actual size is 4′ x 5′
I use this electric staple gun by Bostitch and it works great. You can find one at your local hardware store.
Next staple the canvas in the middle of each side. Do not pull tightly… pull just enough that there are no wrinkles. Also, make sure that the sides of the stretcher bars are running parallel to the weave of the canvas before stapling.
Proceed to staple once every 4 inches or so starting at the middle staple on each side and going to the corners.
Fold the cloth at the corners like you would wrap a present and staple (I usually put a few extra staples at the corners.
Now the canvas is ready for gesso.
Gesso is used to create a barrier between the canvas and the oil paint. If this is not done, the oils in the paint will eventually rot the canvas. The first coat of gesso is thinned with water to a cream like consistency.
Now brush the thinned gesso onto the canvas using a large brush. Make sure it goes into the weave and brush in all directions.
*** Most important****– start from the center of the canvas and work out. The canvas starts to shrink and pucker when it gets wet. See… you didn’t have to pull the canvas tight at the start because it will “shrink wrap” itself when it gets wet (like a pair of jeans that haven’t been pre-shrunk).
I usually do a cross pattern like below and then fill in the remainder diagonally ie. upper right, then lower left, etc.
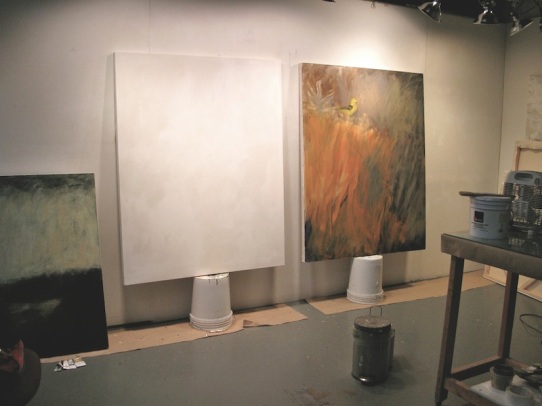
So here it is with the first coat finished. It’s tight with no wrinkles. Two more coats (not diluted) will be brushed on to complete the gessoing. Let each coat thoroughly dry (about 24 hours) between coats. It’s next to the canvas I worked on last week (which is unfinished).
Oh, and the reason I go through all this is to have the flexibility of getting the exact size canvas I want. Maybe I want a 30″ x 45″ or 36″ x 54″ or 40″ x 50″ canvas… these are not standard and the art store doesn’t have these. But they do sell stretcher bars in numerous sizes.


Fascinating, I knew there was a base coat that the canvas received before it was painted with oils but had never seen the process before… Thanks Anita great post!
thank you, Marty. I’m glad you enjoyed reading about the process.
I stretch….I always paint canvas’s
that are to large to buy. The whole time I studied art in school, I never met another student who know how to build their stretcher frame, etc. I spread my gesso with a large sheet rock tool, used to apply mud to the wall.
Thank you for sharing this information!
thanks for commenting… I sometimes use a large palette knife for the final coat. It’s amazing how few painters stretch their own canvas! I like my gesso coating much better than when I buy a canvas prestretched and preprimed.
Beautiful work, I have seen it on you tube but yours is more precise and has tips not found there. Gosh! I never knew oil paint ruins the canvas without Gesso, and I started one in December, is there any way of rescuing it?
well, if you painted oil directly on raw canvas, the oil will soak into the weave eventually. The one thing you can do is mount the canvas to board (I would consult a framer on how to do this.) But, anyway the rot of the canvas won’t happen for awhile…. it’s just not archival to paint oil directly on raw canvas.
Thanks for the info, I appreciate :)
no problem good luck : )
How cool ! Is it cheaper to do it this way?
It’s not worth it for smaller canvas sizes (unless you want something in a very unusual size). But for large sizes, yes, I think it’s worth it. Also, I would have to rent a truck if I bought a canvas at the art store the size I just gessoed here.
Yea, those are huge :) But you are very talented ! I wish I was more artistic & crafty! But, I am working on that this year :)
my advice to you is to never give up… not everything turns out. then they become “learning experiences” : )
thanks i won’t :)
A very helpful post on canvas prep, but I was more enthralled with your painting. Just beautiful.
thank you!
Very informative post. I enjoy reading about this type of thing. I think it is really interesting that you are the maker from the very early stages of the piece. It fits well with the natural and organic feel of your work.
thanks, Jennifer. It’s a bit time consuming but, I think it’s worth it in the end :)